개인공부/SPRING
@Bean vs @Component 차이
- -
@Component 란,
@Component는 개발자가 직접 작성한 Class를 싱글톤 클래스 Bean으로 등록하기 위한 Annotation이다.
* 위에서 설명한 스프링의 컴포넌트 스캔 (@ComponentScan) 기능에 의해 스캔될 때, 주어진 패키지 내에서 @Component 어노테이션이 적용된 클래스를 식별하고, 그러한 클래스의 빈을 생성하여 ApplicationContext에 등록한다.
* (value = "") 옵션이 있고, 해당 옵션을 사용하지 않는다면 class의 이름을 camelCase로 변경한 것을 bean id로 사용한다.
그렇다면 @Controller, @Service, @Repository 어노테이션이란?

@Controller, @Service, @Repository
@Controller, @Service, @Repository 어노테이션들은 @Component 어노테이션의 구체화된 형태이다.
@Bean 이란,
@Bean 어노테이션은 개발자가 직접 제어가 불가능한 외부 라이브러리 등을 Bean으로 만들려고 할 때 사용한다.
* (name = "") 옵션이 있고, 해당 옵션을 사용하지 않는다면 method 이름을 camelCase로 변경한 것이 bean id로 등록된다.
    // 암호화에 필요한 PasswordEncoder Bean 등록
    @Bean
    public PasswordEncoder passwordEncoder() {
        return new BCryptPasswordEncoder();
    }

    // authenticationManager Bean 등록
    @Bean
    @Override
    public AuthenticationManager authenticationManagerBean() throws Exception {
        return super.authenticationManagerBean();
    }
@Bean과 같이 알아야 할 @Configuration
@Configuration 어노테이션은 해당 클래스에서 1개 이상의 Bean을 생성하고 있음을 명시한다.
그러므로 @Bean 어노테이션을 사용하는 클래스는 반드시 @Configuration과 함께 사용되어야 한다.
@Autowired, @Qualifier
@Autowired는 field(속성) , setter, method, constructor(생성자)에서 사용하며 Type에 따라 자동으로 bean을 주입한다.
Type을 먼저 확인하여 못 찾는 경우에는 name에 따라서 bean을 주입한다.
이때 해당 타입의 bean 객체가 존재하지 않거나, 2개 이상 존재할 경우 스프링은 예외가 발생시킨다.
같은 타입의 bean이 두 개 이상 존재하는 경우, 어떤 bean을 주입해야 할지 알 수 없기 때문에 스프링 컨테이너를 초기화하는 과정에서 예외가 발생하는데, 이 경우 @Qualifier 어노테이션을 @Autowired와 함께 사용하여 어떤 bean을 사용할지 명시할 수 있다.
* 추가적으로 @Autowired를 사용할 경우 순환 참조가 발생할 수 있기 때문에 @Autowired 보다 생성자 주입 방식이 더 권장되어진다.
참고 사이트
https://velog.io/@gillog/Spring-Annotation-%EC% A0%95% EB% A6% AC
https://springbootdev.com/2017/07/31/spring-framework-component-service-repository-and-controller/
@Bean vs @Component 차이
@Bean어노테이션과 @Component어노테이션 둘 다Spring(IOC) Container에 Bean을 등록하도록 하는 메타데이터를 기입하는 어노테이션입니다. 각각의 차이점에 대해 알아보자.
@Bean
@Bean어노테이션의 경우 개발자가 직접 제어가 불가능한 외부 라이브러리 등을Bean으로 만들려 할 때 사용된다.
@Configuration
public class ApplicationConfig {
    @Bean
    public ArrayList<String> array(){
        return new ArrayList<String>();
    }
}
위는 @Bean 어노테이션을 이용하여 Bean을 생성한 예제입니다. 위와 같이 ArrayList같은 라이브러리 등을 Bean으로 등록하기 위해서는 별도로 해당 라이브러리 객체를 반환하는 Method를 만들고 @Bean어노테이션을 붙여주면 된다. 위의 경우 Bean어노테이션에 아무런 값을 지정하지 않았으므로 Method 이름을 CamelCase로 변경한 것이 Bean id로 등록된다. (ex. 메서드 이름이 arrayList()인 경우 arrayList가 Bean id)
@Configuration
public class ApplicationConfig {
    @Bean(name="myarray")
    public ArrayList<String> array(){
        return new ArrayList<String>();
    }
}
위와 같이 @Bean어노테이션에 name이라는 값을 이용하면 자신이 원하는 id로 Bean을 등록할 수 있다. 어노테이션 안에 값을 입력하지 않을 경우 메소드의 이름을 CamelCase로 변경한것이 Bean의 id가 된다.
@Configuration
public class ApplicationConfig {

    @Bean
    public ArrayList<Integer> array(){
        return new ArrayList<Integer>();
    }

    @Bean
    public Student student() {
        return new Student(array());
    }
}
의존관계가 필요할 때에는 어떻게 해결할 수 있을까? Student객체의 경우 생성자에서 ArrayList를 주입받도록 코드를 짜 놓았다 이럴 때에는 Bean으로 선언된 array() 메서드를 호출함으로써 의존성을 주입할 수 있다.
@Component
@Component 어노테이션의 경우 개발자가 직접 작성한 Class를 Bean으로 등록하기 위한 어노테이션이다. 아래의 예제를 보자
@Component
public class Student {
    public Student() {
        System.out.println("hi");
    }
}
Student Class는 개발자가 사용하기 위해서 직접 작성한 Class이다 이러한 클래스를 Bean으로 등록하기 위해 상단에 @Component어노테이션을 사용한것을 볼 수 있다.
@Component(value="mystudent")
public class Student {
    public Student() {
        System.out.println("hi");
    }
}
@Component 역시 아무런 추가 정보가 없다면 Class의 이름을 Camelcase로 변경한 것이 Bean id로 사용된다. 하지만 @Bean과 다르게 @Component는 name이 아닌 value를 이용해 Bean의 이름을 지정한다.
@Autowired
@Component

public class Pencil {

...

}

@Component(value="mystudent")
public class Student {
@AutoWired

private Pencil pencil;


    public Student() {
        System.out.println("hi");
    }
}
@Component를 사용한 Bean의 의존성 주입은 @AutoWired 어노테이션을 이용하여 할 수 있다. 위와 같이 Student가 Pencil에 대한 의존성을 가지고 있는 경우 @AutoWired 어노테이션을 이용하여 의존성을 자동으로 주입할 수 있다. 이때 당연히 Pencil도 @Component 어노테이션을 가지고 있어야 한다. 그래야만 IOC Container에 Bean으로 등록이 되기 때문이다.
@Autowired 어노테이션의 경우 형(타입)을 통해 해당 자리에 들어올 객체를 판별하여 주입해준다. 따라서 해당 자리에 들어올 수 있는 객체가 여러 개인 경우, 즉 다형성을 띄고 있는 객체 타입에 @Autowired를 사용한 경우에는 @Qualifier("Bean이름") @Qualifier("Bean이름")을 이용하여 해당 자리에 주입될 Bean을 명시해주어야 한다.
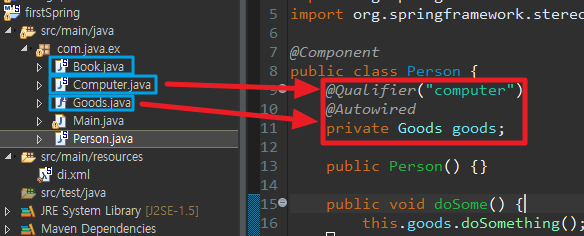
위의 그림에서는 Goods라는 인터페이스를 Computer와 Book이 구현하고 있으므로 Person클래스의 goods 참조 변수에 위치할 수 있는 Bean이 Book, Computer 두 가지이다 때문에 @Qualifier("Bean이름")을 통해 해당 자리에 위치할 빈을 명시했다
사용방법
@Bean
public class Student {
    public Student() {
        System.out.println("hi");
    }
}
우선 의존성 주입 대상 Class를 생성한다. 생성자가 호출될 때 콘솔창에 "hi"를 출력하도록 했다.
@Configuration
public class ApplicationConfig {
    @Bean
    public Student student() {
        return new Student();
    }
}
Student를 Bean으로 등록하기 위해 Config Class를 임의로 만들고 @Configuration어노테이션을 부여했다. 그 후 Student 객체를 반환하는 Method를 작성하고 @Bean어노테이션을 부여한다.
public class Main {
    public static void main(String[] args) {
        ApplicationContext context = new AnnotationConfigApplicationContext(ApplicationConfig.class);
        Student student = context.getBean("student", Student.class);
    }
}
Annotation을 기반으로 Bean을 등록했으므로 AnnotationConfigApplicationContext객체를 생성하고 매개변수로 @Configuration어노테이션을 부여한 ApplicationConfig 클래스를 넘겨준다. 그 후 getBean을 이용하여 사용하면 된다.
@Component
@Component어노테이션이 부여된 Class들은 자동으로 IOC Container에 Bean으로 등록이 되는데 IOC Container에게 이러한 어노테이션이 부여된 Class를 자동으로 Bean으로 등록하라고 하기 위해서 XML 파일에 따로 설정이 필요하다.
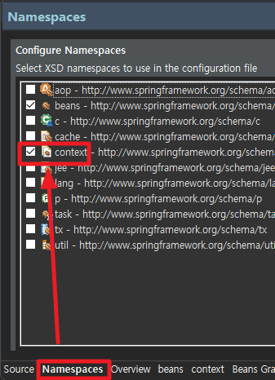
우선 xml파일을 연뒤 하단에 Namespaces 탭을 클릭한뒤context를 체크한 다음 저장을 한다.
<?xml version="1.0" encoding="UTF-8"?>
<beans xmlns="http://www.springframework.org/schema/beans"
xmlns:xsi="http://www.w3.org/2001/XMLSchema-instance"
xmlns:context="http://www.springframework.org/schema/context"
xsi:schemaLocation="http://www.springframework.org/schema/beans http://www.springframework.org/schema/beans/spring-beans.xsd
http://www.springframework.org/schema/context http://www.springframework.org/schema/context/spring-context-3.2.xsd">
<context:component-scan base-package="com.java.ex"></context:component-scan>
</beans>다시 Source 탭으로 돌아와 <context:component-scan base-package="com.java.ex"></context:component-scan> 코드를 추가해주면 준비는 완료된다.
import org.springframework.stereotype.Component;
@Component(value="mystudent")
public class Student {
public Student() {
System.out.println("hi");
}
}@Component 어노테이션을 부여한 Student 클래스이다.
public class Main {

    public static void main(String[] args) {
        ApplicationContext context = new ClassPathXmlApplicationContext("scan.xml");
        Student student = context.getBean("mystudent", Student.class);
    }
}
Main 클래스에서는 기존 XML을 이용하여 의존성을 주입하듯 객체를 생성하면 된다.
4. 요약
@Component는 개발자가 직접 작성한 Class를 Bean으로 만드는 것이고. @Bean은 개발자가 작성한 Method 를 통해 반환되는 객체를 Bean으로 만드는 것이다. 또한 각자의 용도가 정해져 있으므로 정해진 곳에서만 사용 가능하며 다른 곳에서 사용하려 한다면 Compile 에러를 내뱉는다.
👉 @Bean
- @Bean은 개발자가 직접 제어가 불가능한 외부 라이브러리를 사용할 때 사용한다.
- @Configuration을 선언한 클래스 내부에서 사용해준다.
- 즉, 개발자가 작성한 메소드를 통해 반환되는 객체를 Bean으로 만든다.
< 개발자가 직접 제어가 불가능한 외부 라이브러리를 사용한 경우 >
@Configuration
public class ExampleConfig {

    @Bean
    public ArrayList<String> array(){
    	return new ArrayList<String>();
    }
}
< 개발자가 만들어준 클래스를 import 해 사용한 경우 >
@Configuration
public class ExampleConfig {

    @Bean(name="mybean")
  	public Product aaa(){
          Battery p1 = new Battery("AAA", 2.5);
          p1.setRechargeable(true);
          return p1;
   	}
}
< 개발자가 직접 제어가 불가능한 외부 라이브러리를 사용한 경우 >
👉 @Component
- @Component는 개발자가 직접 작성한 Class를 Bean으로 등록할 수 있게 만들어 준다.
- 즉 개발자가 작성한 class를 Bean으로 만든다.
@Component(value="mybean")
public class Example {
	puiblic Example(){
    	System.out.println("Hello world");
    }
}
'개인공부 > SPRING' 카테고리의 다른 글
| @Qualifier 애노테이션 (1) | 2022.10.08 |
|---|---|
| @Autowired 애노테이션 (0) | 2022.10.08 |
| Lombok이란? 및 Lombok 활용법 (0) | 2022.10.06 |
| spring 입문 (0) | 2022.10.06 |
| 어노테이션(@, annotation)의 정의와 종류 (0) | 2022.10.06 |
Contents
소중한 공감 감사합니다